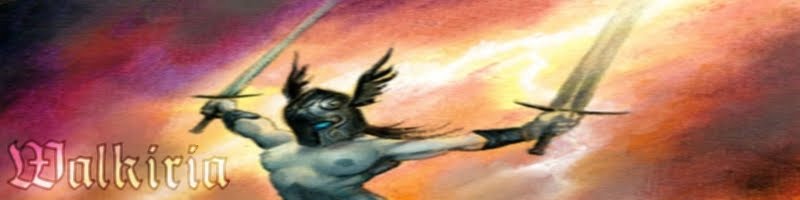
[380 pts]
Type/hits Speed Turns Shields Armour Turrets
Battleship/ 12 20 cm 45 3 5+ /6+ front 3
Armament Range/Speed Firepower/Str Fire Arc
Prow Torpedoes 30 cm 2D6+3 front
Port gunz battery 30 cm D6+4 left
Stbd gunz battery 30 cm D6+4 right
Port heavy gunz battery 15 cm 6 left
Stbd heavy gunz battery 15 cm 6 right
Aft torpedoes 30 cm D6+2 rear
Red Orktober is equiped with Extra Power Fields (included in profile) and Mega-armoured Boarding Parties (giving it an additional +1 modifier on boarding). It is led by the infamous Kaptin Morkuz Ramiuzz (rules below).
Red Orktober can fire normal and boarding torpedoes.
Kaptin Morkuz Ramiuzz
Leadership: 7
Re-rolls: 2- diz may only be uzed on Da Red Orktoba’, and no otha re-rollz may be uzed on Da Red Orktoba’
Famuz Freebooter: Kaptin Morkuz Ramiuz iż da only Kaptin on bord diz ship. The ship has all the normal bonuses of having a Ork Warlord on board (and thus may not buy another Warlord for this ship), with the following exceptions: Ramiuz can never be the Fleet Commander, Da Red Orktober’s crew may never be exchanged for another crew.
Under Da Kaptinz (blind) Eye - Ramiuzz pu(ni)shes the crew beyond any limit, which means they are a very proficient (for orks), if somewhat tired crew . This means that when under the Kaptin’s gaze they will work their hands to the bone, but on other occasions they just won’t give a damn.
For every successful Ld check, the ship suffers a -1 penalty to it’s leadership. On the other hand, every unsuccessful Ld check means the ship gets a +1 leadership bonus. These do stack up, so keep count.
Pokazywanie postów oznaczonych etykietą English. Pokaż wszystkie posty
Pokazywanie postów oznaczonych etykietą English. Pokaż wszystkie posty
piątek, 26 listopada 2010
czwartek, 25 listopada 2010
BFG Campaign Overture -The Storm is Comming
The objective of War has always been the same. Not to annihilate our enemies completely, but to utterly crush their will to resist, and thus force them to do our bidding. The true power is not to destroy these who stand against us, but to impose our will upon them without destroying them.
-attributed to Admiral Yegorov, Incunabilis Campaign
- Sir, the Navigator informs we will be exiting warp-space any second now.
- Good, Mr. Krugger, you know the drill. Take us in.
There was a mild shake when the battleship was thrown out of the Immaterium and into the real-space.
- To all sections. This is the XO. Report status.
- Engineering- XO. Deactivate Geller field.
The status reports one after the other flowed down onto the Bridge.
- Sir, all stations report ready. – the XO’s harsh voice reported to Admiral Yegorov
- One left Immelmann, Mr. Krugger
- Yes, Admiral.
The XO commanded the helmsman to make a sharp left circle, while the ship probed the space around it for anything shadowing it in it’s warp-tail. The small warp-space rift that always followed a ship exiting the Emperean, was a good place to hide for any ambushing ship. No such ship was to be found.
- Sensors report no contacts, Sir.
- You know the plan. Proceed.
If was the few words the XO needed.
- Link me to the Astropath, transmit „Hellfire”, then another command followed,
- All hands: battlestations, combat alert!
Soon one after the other 3 more capital ships and a squadron of escorts and numerous transport ships emerged from the Warp-Space.
The Invasion had now begun...
środa, 13 października 2010
Van Burren's Painting Report: Weathering of Ork Trukks
Van Burren here,
I finally managed to find the time to write up the report of my latest painting escapade. This time we will take a look at everyone's favorite four wheeled ramshackle box of exploding death, the Ork trukk.
I know that you all wish you had entire 5000 point armies painted to Golden Daemon standards, yet that not being the case, we have to make due with the skill AND time (there is never enough of it, is there?) we have. Thus, last time we concentrated on very general painting techniques that are quick and easy and give fairly good visual results for organic characters. This time around the report will focus on the quick AND easy weathering, for that touch of realism.
The trukk model is, unlike what you most non-orkers think, quite an elegant and complicated machine. The only mekanikal bitz that are missing is an operational engine to start zooming about for real (well, ok, I AM EXAGGERATING, but the detail put into the engine block, suspension and transmission is amazing). The only complaint I have is that you seldom get to see all this goodness as the trukks usually end up exploding before anyone has a chance to say "Oh, that's ne..!". On the other hand, the trukk has a lot of flat surfaces with mixed texturing. The flat surfaces make for good contrast to the machine bits and can be used to add a lot of personalization to the trukks. All in all, this is a really fun model to build, convert, and paint.
Strangely enough, the ork technology of the 40-first millennium is very close to ours, and so it is fitting to use our trukks as reference.
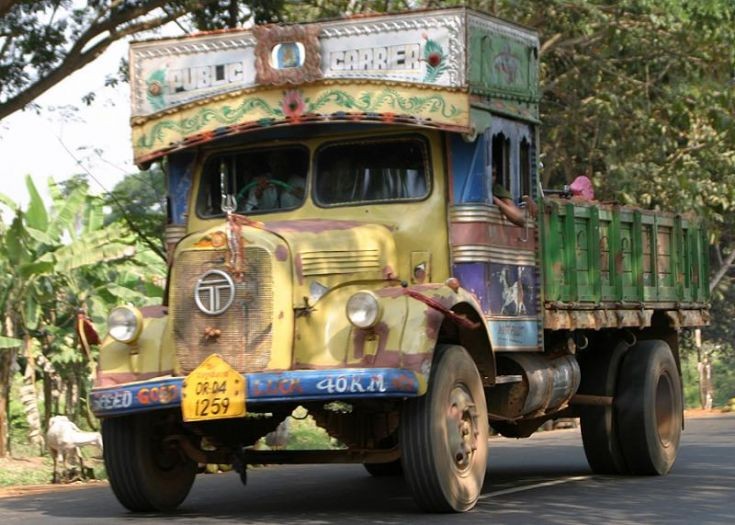
Ork Trukk circa 1996
Take a look at the picture above. Notice the rust all over the unpainted metal and eating away at the paint. Also of import is the dust on the sides of the tiers. For even more reference pictures just do an image search for truck + dirty + panties.
For my particular trukks I was aiming for the look of a WWII German half-track inbred with a garbage bin.
Let's get down to the painting table.
I started off by priming my trukks and adding a single coat of paint for, well, the paint.
 Nothing special there. Next, I painted all the metallic parts with boltgun metal. Here comes the INTERESTING part: after the paint dries, I use a mix of 2/3 Tin Bitz and 1/3 Dark Flesh and a bunch of water to create a wash. This is my "rust" wash. Notice that we are going to apply it on bare boltgun metal. The question that we have to ask ourselves is w-h-e-r-e will the rustiest bits be and where we will have no rust.
Places where rust accumulates:
- Unpainted metal exposed to water
Places where metal is less likely to accumulate:
- Moving bits
- Hot bits
- Very dry bits
- Smokey bits
- Oiled bits
- Touchy bits (handles and some such)
Following this short guide and our reference pictures, we apply more-less-none of the wash to the metal bits on the model.

After the wash is completely dry I applied a black wash to the metal bits to add some cheap shading. At this step I also applied a wash to the painted parts using a mix of black and dark green. Once THAT dries, I used some mythril silver to highlight areas where the metal is more polished.
Places where the metal will be the shiniest are any areas that will be often rubbed by the orks. As they are not likely to be actually cleaning anything, these will only include the service areas. I also used it to add edge highlights to the rest of the metal, for the pop-effect. Look at the picture below and notice how I put my mythril where my mouth is :P
 The next little step was to dry brush highlights on the Paint as well as adding some white edge highlights to emphasize the straight edges.
 Once we have the paint (and whenever I say the paint, I mean the Paint) ready, it is time for some weathering on it.
Digressing....
Long, long time ago, in a land far away, there lived... Bolt and Rivet. Bolt and Rivet were laying happily in dump land when suddenly a big green tornado of teeth and wrenches took them far away. Where he screwed both of them. After the screwing, they were covered under a thick layer of icky paint. The Bolt and the Rivet thought that there life was over, as they were away from water and air, but it was not so. Soon enough they found themselves being jerked ... and vibrated... until they became loose and the paint cracked around Rivet. When that happened water seeped in between them and they started to ... oxidate.
To simulate this I went over all the screw heads under the paint and applied some rusting (you can use the same wash as before). Use as much as you want, just remember to highlight the bolt once you are done to create a nice contrasting effect.
 Ok, time for another effect. But before we do that let's paint in some of the other details not related to weathering. Now. ... Mud. ... Orks love mud... it reminds them of childhood. To make mud I looked to my spice cabinet. Ground cinnamon! Looks good. Take the cinnamon (or any other fine powdery condiment) and mix it with white glue and the color of your own personal mud. The cinnamon will absorb it all and create a thick paste that you can now apply wherever mud naturally goes... which is everywhere. Take special "care" of places where the wheels are, where orks move about (yeah, they like mud), and any other spot that will have contact with the ground.
In this case it was the wheels, anything near the wheels, the ramming bit, the loading area, and the seats.... oh, wait, that's not mud.
 Once all that is finished. We can add some dusting. A very fine wash applied sparingly bottom up on the vehicle. Dust accumulates everywhere but the closer to the ground, the more of it will be.
 Although we are done, there are few more touches I want to show you.
Chipped paint. Using a sponge dabbed in black paint I rubbed it wherever the paint would come into contact with some scratchy bits and then painted the inside of the black with mythril, as can be seen on the next photo.
 I used a toothbrush to add a spatter effect of muddy water on the sides of the truck and of a mark of an unfortunate road blocker on the front of the truck.
 On the previous picture on the ram, and on the next one, on the wheels, check the mythril marks showing where the dirt/rust/poop/'umies got recently rubbed off.
 Other interesting things to note:
Sooty engine block and exhausts.
Rubbed handles.
Rockets, being "disposable" do not show any aging.
Where did the other trukk go?
I hope all of this will be helpful to getting your weathering done in an hour or two (as opposed to leaving your model outside the window for a year).
Allright, that's it for now! May the emperor protect.
I finally managed to find the time to write up the report of my latest painting escapade. This time we will take a look at everyone's favorite four wheeled ramshackle box of exploding death, the Ork trukk.
I know that you all wish you had entire 5000 point armies painted to Golden Daemon standards, yet that not being the case, we have to make due with the skill AND time (there is never enough of it, is there?) we have. Thus, last time we concentrated on very general painting techniques that are quick and easy and give fairly good visual results for organic characters. This time around the report will focus on the quick AND easy weathering, for that touch of realism.
The trukk model is, unlike what you most non-orkers think, quite an elegant and complicated machine. The only mekanikal bitz that are missing is an operational engine to start zooming about for real (well, ok, I AM EXAGGERATING, but the detail put into the engine block, suspension and transmission is amazing). The only complaint I have is that you seldom get to see all this goodness as the trukks usually end up exploding before anyone has a chance to say "Oh, that's ne..!". On the other hand, the trukk has a lot of flat surfaces with mixed texturing. The flat surfaces make for good contrast to the machine bits and can be used to add a lot of personalization to the trukks. All in all, this is a really fun model to build, convert, and paint.
Strangely enough, the ork technology of the 40-first millennium is very close to ours, and so it is fitting to use our trukks as reference.
Ork Trukk circa 1996
Take a look at the picture above. Notice the rust all over the unpainted metal and eating away at the paint. Also of import is the dust on the sides of the tiers. For even more reference pictures just do an image search for truck + dirty + panties.
For my particular trukks I was aiming for the look of a WWII German half-track inbred with a garbage bin.
Let's get down to the painting table.
I started off by priming my trukks and adding a single coat of paint for, well, the paint.
 Nothing special there. Next, I painted all the metallic parts with boltgun metal. Here comes the INTERESTING part: after the paint dries, I use a mix of 2/3 Tin Bitz and 1/3 Dark Flesh and a bunch of water to create a wash. This is my "rust" wash. Notice that we are going to apply it on bare boltgun metal. The question that we have to ask ourselves is w-h-e-r-e will the rustiest bits be and where we will have no rust.
Places where rust accumulates:
- Unpainted metal exposed to water
Places where metal is less likely to accumulate:
- Moving bits
- Hot bits
- Very dry bits
- Smokey bits
- Oiled bits
- Touchy bits (handles and some such)
Following this short guide and our reference pictures, we apply more-less-none of the wash to the metal bits on the model.

After the wash is completely dry I applied a black wash to the metal bits to add some cheap shading. At this step I also applied a wash to the painted parts using a mix of black and dark green. Once THAT dries, I used some mythril silver to highlight areas where the metal is more polished.
Places where the metal will be the shiniest are any areas that will be often rubbed by the orks. As they are not likely to be actually cleaning anything, these will only include the service areas. I also used it to add edge highlights to the rest of the metal, for the pop-effect. Look at the picture below and notice how I put my mythril where my mouth is :P
 The next little step was to dry brush highlights on the Paint as well as adding some white edge highlights to emphasize the straight edges.
 Once we have the paint (and whenever I say the paint, I mean the Paint) ready, it is time for some weathering on it.
Digressing....
Long, long time ago, in a land far away, there lived... Bolt and Rivet. Bolt and Rivet were laying happily in dump land when suddenly a big green tornado of teeth and wrenches took them far away. Where he screwed both of them. After the screwing, they were covered under a thick layer of icky paint. The Bolt and the Rivet thought that there life was over, as they were away from water and air, but it was not so. Soon enough they found themselves being jerked ... and vibrated... until they became loose and the paint cracked around Rivet. When that happened water seeped in between them and they started to ... oxidate.
To simulate this I went over all the screw heads under the paint and applied some rusting (you can use the same wash as before). Use as much as you want, just remember to highlight the bolt once you are done to create a nice contrasting effect.
 Ok, time for another effect. But before we do that let's paint in some of the other details not related to weathering. Now. ... Mud. ... Orks love mud... it reminds them of childhood. To make mud I looked to my spice cabinet. Ground cinnamon! Looks good. Take the cinnamon (or any other fine powdery condiment) and mix it with white glue and the color of your own personal mud. The cinnamon will absorb it all and create a thick paste that you can now apply wherever mud naturally goes... which is everywhere. Take special "care" of places where the wheels are, where orks move about (yeah, they like mud), and any other spot that will have contact with the ground.
In this case it was the wheels, anything near the wheels, the ramming bit, the loading area, and the seats.... oh, wait, that's not mud.
 Once all that is finished. We can add some dusting. A very fine wash applied sparingly bottom up on the vehicle. Dust accumulates everywhere but the closer to the ground, the more of it will be.
 Although we are done, there are few more touches I want to show you.
Chipped paint. Using a sponge dabbed in black paint I rubbed it wherever the paint would come into contact with some scratchy bits and then painted the inside of the black with mythril, as can be seen on the next photo.
 I used a toothbrush to add a spatter effect of muddy water on the sides of the truck and of a mark of an unfortunate road blocker on the front of the truck.
 On the previous picture on the ram, and on the next one, on the wheels, check the mythril marks showing where the dirt/rust/poop/'umies got recently rubbed off.
 Other interesting things to note:
Sooty engine block and exhausts.
Rubbed handles.
Rockets, being "disposable" do not show any aging.
Where did the other trukk go?
I hope all of this will be helpful to getting your weathering done in an hour or two (as opposed to leaving your model outside the window for a year).
Allright, that's it for now! May the emperor protect.
sobota, 4 września 2010
BFG Chaos Fleet update
This is the full extent of my Chaos Fleet (excluding Attack Craft):

Since last update, I've added the Blackstone Fortress (right highest) , Planet Killer (highest center right), Despoiler Battleship (second highest left), Vengence Class Grand Cruiser (right second highest), Nox Eternus (the biggest ship) and painted the bases. The Battleships aren't pinned to their bases yet.
Edit [5.09.2010]:
This is the Vengance Class grand Cruiser "Tranquilious":


piątek, 3 września 2010
Tactica Imperialis: Tauros, Tauros Venator

"Just drive down that road, until you get blown up"
- General George Patton, addressing reconnaissance troops
Since the Blog gets more hits from International viewers then from Polish ones, I’ve decided to go for an full English article this time. This article is a continuation of previous Tactica Imperialis articles written by your humble scribe (me) in low gothic (Polish) about Griffons, Penal Legions and Sentinels.
So without further ado...
Tauros and Tauros Venator are the two new toys from Forge World for all the Tread Heads out there. Their rules can be found in Imperial Armour Vol. 8 Raid on Kastorel-Novem. All the coolness factor aside (IG buggies - yeah!!!), let us consider their battlefield efficiency.
These two vehicles share a few special rules: scout, open-topped and fast are the standard ones, but theres more...
You’ve been thinking about buying a hybrid car? - Well, think again: the purely electric driven Tauros (thanks to the Galvanic Motors®) is the best thing since bread came sliced. On 4+ you ignore Immobilized armor penetration results. This is just awesome for a squadroned vehicle (one does not need to deny the enemy his vehicle by blowing it up!) . On top of that you can re-roll failed Dangerous Terrain tests, when moving at combat speed- this too sometimes comes in handy.
Let’s take on the smaller of the two vehicles first: the Tauros.
I will compare it to the most similar unit from the generic IG codex: the sturdy Scout Sentinel (later referred to as SS (but not as “The SS”) For just the same cost as a SS with a heavy flamer you get the basic Tauros (with a heavy flamer as well). You loose the ability to engage the enemy in close combat, but you get the ability to move 12” and still fire your heavy flamer. When outflanking this gives your the ability to threaten enemy infantry that is up to 20” from a short table edge.
This buggy has a drawback however- the options it has are generally sub-par army wise. The special-issue Tauros grenade launcher is a mid-strength/low-strength blast weapon- one of many, many the IG can field (the 4 GL Platoon Command Squad comes to mind) and I really don’t see anything justifying mounting it on a speedy car. The grenade launcher variant does not improve the overall army performance of the Imperial Guard. A fast and cheap heavy flamer carrier does.
And now for something completely different...
oh well, maybe not that much different: Tauros Venator (I will restrain myself from using the TV abbreviation)
for 10 points more you can buy Tauros’ combi-cabrio version: you get 2 more wheels and 2mm armored plate for some real protection from the front - STOP- this doesn't interest gamers that much, let's try again...
for 10 points more then the standard Tauros you get AV11 front, and a twin-linked multilaser. Honestly I think that multilaser SSs are much better. Point for point (almost) they have the same firepower and can take just as much punishment before going down (2 TVs vs. 3 SSs), but Sentinels can attack in close combat- which is advantageous for a outflanking unit.
So what makes the Venator good?- well the TL lascannon does. The lascannons always have come with some kind of sacrifice in the IG codex, and it’s great to have one more option of deploying this powerful tool of Emperor’s Justice. For 65 pts, you get a fast moving lascannon platform, that is quite accurate, and has a small size (so is easily to hide).
Unlike the Vendetta- it can easily be completely or partially hidden (even behind infantry!). A squadron of Venators can maintain maximum firepower when moving up to 12”, whereas a Vendetta can not. For these advantages one has to sacrifice the transport ability and some firepower at low speeds.
The goodies don’t just stop here- the Venator can take up to 2 HKM’s (bumping it’s cost to a whooping 85 pts for a wet paper buggy [with some cardboard to the front- to make it just]. This certainly is a valid option, although one has to be very careful in using this paper sword. A squadron of 3 TVs all kitted out with lascannons and HKM’s costs over 250, and I would only seldom advise taking it.
Summary:
The Tauros and Tauros Venator make great additions to the Imperial Guard Army, but unlike Scout Sentinels they are highly specialized, and can only perform well their specific task: Tauros as a infantry killer, and Venator as a Tank/Monster hunter. Both Tauros variants are designed to punch the enemy in the face (the Venator preferably from 2 leagues away, as not to get punched back) and should be used this way. They either can not fulfill the many roles the Sentinels can, or would so for much more points, so it’s probably good to use both these units at the same time. The Venators present a valid alternative to the much loved (or hated, dependant upon if you are looking up or down the lascannon’s barrel) Vendetta Gunship, whereas the smaller Tauros replaces Flamer Sentinels.
wtorek, 31 sierpnia 2010
Painting Report: Ogryn 1996
Van Burren here,
My first time on this blog with a Painting Report!
First, let me start with giving a bit of background on me & painting:
I started painting miniatures back in 1996. That was when I got me a shiny box of second edition WH 40k and botched all the marine miniatures with a silver spray ... Having ruined all of the marines I only had the orks left, which I then started collecting and painting.
Due to life's unforeseen circumstances... and lack of a gamer group in my new town, I stopped painting in 1999. That was a sad time in my life....
In March 2009 when I got me a shiny box of 5th edition WH 40K and relived beautiful memories from my childhood, with the exception of raping my space marines with wall paint. And so I painted some more orks with a strong feeling of deja vu.
Apart from miniature painting I have doubled in digital art, REAL painting, lots of sketch work, murals, sculpting and all sorts of artsy stuff since I was ... hmmm I don't recall ever not doing any of that. I you could say I have a fairly strong background when it comes to paint. Also, I would like to mention I'm addicted to coolminiornot.
I do hope this is not going to be the last report of this kind... and I promise not to rant on the next one.
Anyyyyywayyyyyss, back to business.
Today I'm going to be painting (in a figurative sense) an Ogryn bone 'ead called Stefa, from 2nd edition (whom I managed to retrieve from the time-warp he was sitting in since 1999).
Those Ogryns were a bit different from the modern day ones. They had a bit more of an edge to them and less of a I-m-too-dumb-to-wipe-my-own-arse look on their faces.
Since he was already painted by me back in 1996 (... doesn't that sounds like a quote from "Back to the Future 3"?) I decided to simply enhance that paint job. So here is the first pic showing the ogryn with a new coat of paint.

I wish I had made a photo of him before I started painting, so you will have to use your imagination or x-ray vision to see what he looked like before.
The colors I used there were dwarf flesh, german cammo green, chaos black(weapon). All the remaining paint was there before.
First I started off with the gun using a technique I use from most inorganic objects. I added highlights with about 1/2 black 1/2 Enchanted Blue, then added edge highlights with 3/4 khaki 1/4 black, then added pure khaki extreme highlights, and some very extreme pure white highlights. This is not very fine blending and to tie the colors together I washed it with badab black ink. After it dried I redid some of the extreme highlights with a watered down white.
 I do not like to spend a lot of time on guns and other menial equipment as I find it that it requires a lot of concentration to make blending on them look very good and for me it is not interesting enough to do spend time on it. The technique I used here did not take more than a few minutes and the result is satisfactory for anything other then competition entry or collector piece.
Next up I did the metallics on the gun. I undercoated it all with boltgun metal and then applied highlights with mithril silver, washed with badab black, and redid some mithril highlights. Sometimes I use a mix of white and mithril silver to do extreme edge highlights. Also notice that I painted the shells. Since I do not have a brass colored paint I based them with burnished gold, then washed with badab black and gryphon sepia, and at the end dry brushed some mythril silver.
 This is my favorite part, painting the skin. I really enjoy painting the organic bits such as skin and fur as a more free and imprecise way of painting, such as mine, works to the benefit of such surfaces as they are never perfect in nature. The first thing I did was to gradually paint from dwarf flesh to white (off-white is an even better choice). I did this by putting a bit of white right next to dwarf flesh on the palette and mixing them in between, gradually adding more white to the mix. I usually do this by eye, but what I end up doing in the end, is painting around three to four progressive levels till I arrive to near-white.
 Ok, we finished doing the gradient.... but it certainly does not look like skin! Oh, wait my friends, do not throw the first stone! We are only behind the first and least inventive step. What we need to do now is to add character. I've done this by adding things like a red nose (diluted blood red), swelling around the band-aid, eyes!, drybrushed hair, and redness on stressed joints using diluted red gore.

Now we are getting somewhere! Notice on that last picture that I also painted the combat blade. I used the same technique as the metal on the gun, and after that added weathering to both by washing them with a mix of strongly watered down tin bitz and dark flesh. Also, I added some dried blood smearing to the knife using a loose brush with only a little diluted red gore, it is better visible on the next pic.
As the flesh still looks way to fresh and baby like, I added a wash of very watered flesh-sepia-black to the whole skin area, making sure that the paint does not pool.
 The clothing and leather were painted in a similar way to the gun. 1. Do three stages of highlights, 2. Wash with base color, 3. Re-do extreme highlights. For leather I used a bit more extreme highlight as leather tends to reflect light much better. I added another highlight to the skin mixing gloss varnish, white, and dwarf flesh to reinforce the highlights and add it a lively feel.
 The 98% finished model looks like this:
 And here are the pics of his buddies:

 Allright, that's it for now! May the emperor protect.
My first time on this blog with a Painting Report!
First, let me start with giving a bit of background on me & painting:
I started painting miniatures back in 1996. That was when I got me a shiny box of second edition WH 40k and botched all the marine miniatures with a silver spray ... Having ruined all of the marines I only had the orks left, which I then started collecting and painting.
Due to life's unforeseen circumstances... and lack of a gamer group in my new town, I stopped painting in 1999. That was a sad time in my life....
In March 2009 when I got me a shiny box of 5th edition WH 40K and relived beautiful memories from my childhood, with the exception of raping my space marines with wall paint. And so I painted some more orks with a strong feeling of deja vu.
Apart from miniature painting I have doubled in digital art, REAL painting, lots of sketch work, murals, sculpting and all sorts of artsy stuff since I was ... hmmm I don't recall ever not doing any of that. I you could say I have a fairly strong background when it comes to paint. Also, I would like to mention I'm addicted to coolminiornot.
I do hope this is not going to be the last report of this kind... and I promise not to rant on the next one.
Anyyyyywayyyyyss, back to business.
Today I'm going to be painting (in a figurative sense) an Ogryn bone 'ead called Stefa, from 2nd edition (whom I managed to retrieve from the time-warp he was sitting in since 1999).
Those Ogryns were a bit different from the modern day ones. They had a bit more of an edge to them and less of a I-m-too-dumb-to-wipe-my-own-arse look on their faces.
Since he was already painted by me back in 1996 (... doesn't that sounds like a quote from "Back to the Future 3"?) I decided to simply enhance that paint job. So here is the first pic showing the ogryn with a new coat of paint.

I wish I had made a photo of him before I started painting, so you will have to use your imagination or x-ray vision to see what he looked like before.
The colors I used there were dwarf flesh, german cammo green, chaos black(weapon). All the remaining paint was there before.
First I started off with the gun using a technique I use from most inorganic objects. I added highlights with about 1/2 black 1/2 Enchanted Blue, then added edge highlights with 3/4 khaki 1/4 black, then added pure khaki extreme highlights, and some very extreme pure white highlights. This is not very fine blending and to tie the colors together I washed it with badab black ink. After it dried I redid some of the extreme highlights with a watered down white.
 I do not like to spend a lot of time on guns and other menial equipment as I find it that it requires a lot of concentration to make blending on them look very good and for me it is not interesting enough to do spend time on it. The technique I used here did not take more than a few minutes and the result is satisfactory for anything other then competition entry or collector piece.
Next up I did the metallics on the gun. I undercoated it all with boltgun metal and then applied highlights with mithril silver, washed with badab black, and redid some mithril highlights. Sometimes I use a mix of white and mithril silver to do extreme edge highlights. Also notice that I painted the shells. Since I do not have a brass colored paint I based them with burnished gold, then washed with badab black and gryphon sepia, and at the end dry brushed some mythril silver.
 This is my favorite part, painting the skin. I really enjoy painting the organic bits such as skin and fur as a more free and imprecise way of painting, such as mine, works to the benefit of such surfaces as they are never perfect in nature. The first thing I did was to gradually paint from dwarf flesh to white (off-white is an even better choice). I did this by putting a bit of white right next to dwarf flesh on the palette and mixing them in between, gradually adding more white to the mix. I usually do this by eye, but what I end up doing in the end, is painting around three to four progressive levels till I arrive to near-white.
 Ok, we finished doing the gradient.... but it certainly does not look like skin! Oh, wait my friends, do not throw the first stone! We are only behind the first and least inventive step. What we need to do now is to add character. I've done this by adding things like a red nose (diluted blood red), swelling around the band-aid, eyes!, drybrushed hair, and redness on stressed joints using diluted red gore.

Now we are getting somewhere! Notice on that last picture that I also painted the combat blade. I used the same technique as the metal on the gun, and after that added weathering to both by washing them with a mix of strongly watered down tin bitz and dark flesh. Also, I added some dried blood smearing to the knife using a loose brush with only a little diluted red gore, it is better visible on the next pic.
As the flesh still looks way to fresh and baby like, I added a wash of very watered flesh-sepia-black to the whole skin area, making sure that the paint does not pool.
 The clothing and leather were painted in a similar way to the gun. 1. Do three stages of highlights, 2. Wash with base color, 3. Re-do extreme highlights. For leather I used a bit more extreme highlight as leather tends to reflect light much better. I added another highlight to the skin mixing gloss varnish, white, and dwarf flesh to reinforce the highlights and add it a lively feel.
 The 98% finished model looks like this:
 And here are the pics of his buddies:
 Allright, that's it for now! May the emperor protect.
sobota, 7 sierpnia 2010
Imperium vs. Chaos BFG BattleReport
"The great questions of the day will not be settled by means of speeches and majority decisions ... but by iron and blood"
-Otto von Bismarck
Na razie tylko zdjęcia. Opis jeszcze się pojawi...
Just Pictures for now. A discription will follow- eventually...
Deployment:

Turn 1 Chaos:

Turn 1 Imperial Navy:

Turn 2 Chaos:

Turn 2 Imperial Navy:

Turn 3 Chaos

Turn 3 Imperial Navy

Turn 4 Chaos

Turn 4 Imperial Navy

Turn 5 Chaos

Turn 6 Chaos

niedziela, 1 sierpnia 2010
Warsaw 1944
 "This is Poland calling. This is Warsaw calling. This is Warsaw calling. Warsaw calling. Warsaw calling all the free nations."
-Radio Błyskawica (Radio Lightning the radio-station of Warsaw Uprising)
This is the very first post in English on this blog and for a good reason so.
The topic isn't really very much connected to Wargaming, but I feel it really deserves mentioning.
I have two stories to tell, one about an event that happened today, and one about an battle that started 66 years ago.
As I was driving through the city today and listening to the radio I didn't really know what hour it was. Then I stopped at the lights and looked at the clock- it was 16:59. Then all around sirens started to wail. I dropped the gear and got out of the car.
What I witnessed is what I wouldn't expect. Everybody in eye-sight was standing, some people almost like at attention. Cars stopped everywhere and more people were getting out of them and standing up-right. I have never seen anything like this before, nor did I think there was such a spirit to honor our history in so many of my fellow citizens.
This was to honor what started exactly 66 years ago.
17 O'clock August the 1st 1944 was the "W"-hour. The Warsaw Uprising had started. An action unprecedented in the history of XXth century Europe.
It has been questioned time and time again if it decision to start the Uprising was right. I'm not going to discus this- that's a topic for a entire series of books.
I'm going to concentrate on the people who fought and died in the Warsaw Uprising. Their courage to stand for what is right, to stand against the oppressors, even in face of death - has cost tenths of thousands of freedom fighters from the Home Army and other Polish military organizations their lives. Now in free Poland they can be treated as Heroes again. In their honor the Polish nation was united today- I didn't expect to see what I saw today.
Soldiers of Poland who fought in the Operation Tempest and specifically in the Warsaw Uprising I salute you!
I was moved by what I saw today and just wanted to share this with all the international readers.
Onto wargaming and if you want to know more about the Uprising:
on the battefront webpage you can find a Briefing about Polish Home Army and Warsaw Uprising, as with most of their materials they are quite accurate and informative:
http://www.flamesofwar.com/hobby.aspx?art_id=1622
and on the webpage of the Warsaw Uprising museum:
http://www.1944.pl/en/
Subskrybuj:
Posty (Atom)